By Josiah Young, OD, MS
Taking the time to become proficient at examining children and fitting them for glasses can be a boost for your practice. Think about the last time you did an eye exam on a young child. Was it a positive experience? Or were you pulling your hair out chasing a 3 year old around the office? Being a trusted resource on the vision of children pays dividends for your practice and your local community. All it takes is the right tools and procedures to make the visit to your office go smoothly. Here are a few tips to help you become a children’s vision hero.
Performing the eye exam on a preschool aged child is different than the adult eye exam. It is comprised of the same basic diagnostic components, but the attitude of the child (that day) can greatly affect your ability to perform the testing needed. When scheduling the appointment, have your staff tell the parents to bring the child in well rested and preferably after a meal. A tired or hungry child, as most parents know, is not cooperative for anything, let alone an eye exam.
Make your office child friendly. You don’t have to turn your office into a pediatric center. Just have a small area with kids’ books and toys. A children’s corner can add a splash of color to a sterile looking doctor’s office. Have some child friendly videos playing in your waiting room video loop. A few small additions like these will make the child (and the parents) feel more comfortable in your office.
Pre-exam testing can be done on a child, but it depends on how mature the child is and what the child is willing to do that day. Train your technician to spot a child who can do some of your normal pre-tests (stereopsis, color, etc.) and to move on quickly if the child is unable to understand them. It’s important to remember that you do not have to perform every test on every patient. Be willing to adapt and go with the child’s cooperation level to get as much done as you can.
During the eye exam, you must work quickly to keep the child’s attention. Make it light and fun, but be prepared to reschedule for another day if the child is uncooperative. The only child you cannot examine is one that hides their eyes. If you can at least get the child to look at your lights, you’ll be able to perform a satisfactory exam without them saying a word.
Building trust with the child is the single most important element to being able to successfully complete the exam. Bounding into the room wearing your white coat with your retinoscope in hand may scare the child. For this reason, I do not wear my coat for examining children. Ask simple questions about their name and age to help them warm up to you. Depending on how they respond to these questions, you can get a read on how the rest of the exam may go. If the child is still leery of you, ask them if they’d like to play some games to help check their eyes. Most of the time, the child will be excited to play your diagnostic “games” with you. Keeping your voice exciting and upbeat will convey a sense that it just might be fun!
Older children are natural helpers. Use this tactic of having them “help” you to accomplish some of your diagnostic tests. For example, ask the child to hold something. I like to use a pen light and have the child hold it to shine light in my eyes. I ask them to tell me if my eyes “are working OK” as we shine light into my eye. If the child is older, you can have them look for your pupil to change size. Then turn the test around and say, “Now let’s see if your eyes are working OK too.” This is a good time to assess pupil function and assess angles using the shadow test.
Checking visual acuity on a young child can be a challenge. I have refined my method over the years and can typically get acuity on 2 and 3 year olds with relative ease. We are used to adults knowing how to read the row of letters on the acuity chart. A young child who is likely having their first eye exam may not be familiar with this concept. Isolating symbols, shapes or letters is the best way to obtain a young child’s visual acuity. 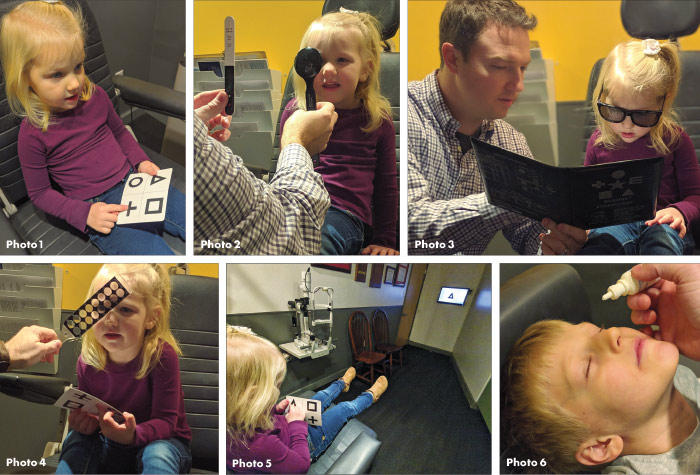
Young children are not always confident with the name of a shape or picture, so it is important to have a matching card available. You can often get 2 year olds to match shapes by pointing to the card (Photo 1). Start with both eyes together with a large isolated picture or shape. Praise the child early and often for getting the answers correct and move down in size quickly. Once the child does not confidently respond, you can retest several optotypes at that size to confirm their visual acuity. When checking monocular acuity, do not let children hold the cover paddle because they may not fully occlude the eye.
The cover test is another important diagnostic test for the young child. Using a stationary distance fixation target, you can perform this with the cover paddle or even your hand. Have several interesting targets to change around to keep their attention. Do the same for a near target to assess alignment at near. I use a PD stick with several colorful pictures on it. I ask the child to tell me about each picture as I perform the cover test. Then I move straight into assessing extraocular muscles. Have them follow one of the pictures to all positions of gaze. Finish back in front of their face and have them follow the picture all the way to their nose. Do not skip the near point of convergence test as Convergence Insufficiency is easily tested but a commonly missed diagnosis (Photo 2).
Stereopsis and color vision testing are useful, but they are not always able to be performed depending on the age and cooperation of the child. The HRR pseudoisochromatic plates have shapes instead of numbers. Have the child use a cotton swab as their “magic wand” and point to the shapes in the book. Use good light and keep fingers away from the pages of the book so as not to tip off the answers with smudges.
I like using the Randot Stereo Test book for near stereopsis. Results can vary depending on how you ask the child to respond. Sometimes I ask the child to look at the circles and ask them to push the circle down that pops up the highest. Sometimes I say that I can reach my finger “behind” some of the targets. You might come up with your own explanation to get the child to understand the test. Another neat trick is that you can turn the stereo glasses upside down on the child’s face, and all the depth will appear to go into the page of the book. Sometimes kids notice that better than the targets popping out (Photo 3).
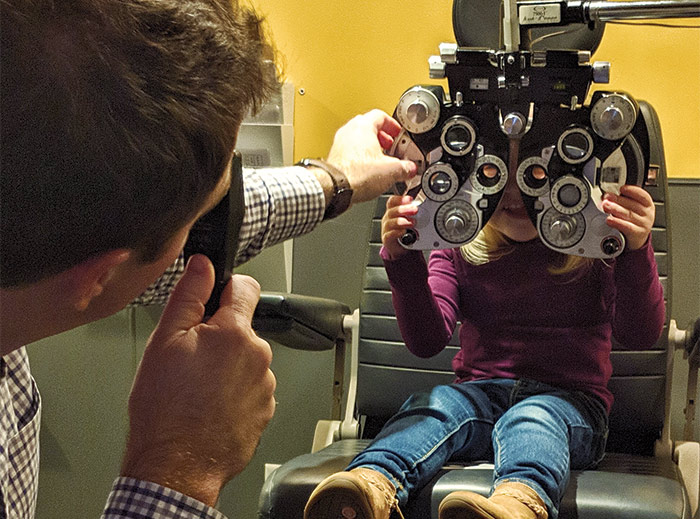
One of the most important of diagnostic instruments in your toolbox for examining children is your retinoscope. Even if you can get a young child to sit for pre-testing, children have such excellent accommodation that they can often fool autorefractors. Your retinoscope will give you your best shot at estimating refractive error. Retinoscopy bars are also helpful, although many young children will look through the phoropter if you have an interesting fixation target (Photo 4).
My favorite tool in the exam room for examining children is my digital acuity chart. I use a chart from Harvest Acuity that allows me to upload my own videos via SD card. I have a selection of video shorts that can get nearly any child’s attention for a couple of minutes, which gives me the time I need to perform retinoscopy or other diagnostic tests. This chart has tons of options to keep a child’s attention. It also comes conveniently with HOTV/Shapes near cards that the child can hold to match the figures you put on the chart (Photo 5).
If you still use the Project-O-chart (POC), never fear! Just dial up a red-green slide with children’s pictures or shapes on it. Have lots of questions to ask the child while you perform retinoscopy. “Tell me the first picture on the red side,” is a good example. When I used the POC with Allen symbols, I found it fun to see what children call the telephone symbol as many children have never seen anything like that before in this age of cell phones. Keep asking questions until you have confident readings for your retinoscopy.
Dilating the child can be a daunting task. I have used a few different methods over the years. Even if the child is a “helper,” they may still balk at the idea of putting in eyedrops. For older kids I ask, “Do you want to do eyedrops with eyes open or closed?” Giving them a forced choice moves past the point of “if” and becomes “when” they get eyedrops. Almost all kids pick the choice of eyes closed. Have the child put the crown of their head against the exam chair (face up to the ceiling). Then assure them that you will only put a small drop right in the corner of each eye. Administer the drop and hold their head to keep them from tilting up before the drops can make it into the eyes. Have the child blink several times and then have a tissue ready for them (Photo 6).
Right after dilation, move into the dispensary for a change of scenery. This helps the child get their mind off the drops. If you suspect you will be prescribing glasses, this is a good time to pick out frames. Because most kids have such large pupils, you won’t need to wait long for a good view of the retina, but you might need 20 to 45 minutes for proper cycloplegia depending on your dilating agent.
The last step is to examine the eye. I like to use my BIO and a 20D fundus lens. First, I show them how I can move the spot of light around the room. Then I ask them if they know what a magnifying glass does, and I show them what happens when we put the fundus lens on a target. I like using finger puppets in my off hand as a point of fixation. Move the finger puppets into all positions of gaze, and keep asking the child questions about the targets until you have finished examining the retina.
Before you know it, you’ve completed the exam, and no one is crying. Hopefully the child enjoyed playing your games. Have some rewards like stickers that you can give the child for being so brave for the eye exam. Sometimes the staff will tease the reward early on to reinforce cooperation. Thank the parents for bringing the child into your office for an eye exam. I like to hand the parents my business card with email address because they may have questions later that they did not think of during the exam.
After doing a few of these exams, you’ll develop a rhythm that works for you. Your comfort level will improve, which will show with how easily you get kids to cooperate with you. The parents will see how well their child did in your office, and they may bring more members of their family in for appointments. These parents often talk in discussion circles at the local schools, and I have found it to be our very best referral source.
When you’re ready to see even more kids in the office, visit the nearest elementary school and speak with the school nurse or counselor about what services you provide. Let the school know if you have resources available for financial assistance through Lions Club or various other programs. You can do the same thing with the local pediatrician’s office.
Once you’ve fully transformed into a children’s vision hero, you’ll need to let the world know. Be sure to post on your social media and website about the importance of eye exams for children and your selection of glasses. Another good idea is to create a “what to expect” page on your website about the process of an eye exam for kids. This is one time you need to promote yourself in order to spread the word to others trying to find an eye doctor that can see kids. Your Web team can help with the right verbiage to optimize for search engines.
Whether you are a seasoned pro, or you are just getting started in eyecare, honing your skills with children can help you become a trusted expert in your community and help grow the practice at the same time. ■
EXAMINING THE YOUNGEST EYES
When doing an infant vision exam, many of the same rules apply as the young child exam. Here are a few important points to remember when doing an eye exam on an infant child.
1. BEST PRACTICES
For a successful exam, have the parent bring in the child well rested and recently fed. Have mom or dad sit in the exam chair, and hold the child to keep them comfortable. Have a few toys or lights to change around for getting the child’s attention. Remember the old saying, “One toy, one look.”
2. THE DIAGNOSTIC TESTS ARE DIFFERENT FROM ADULTS
I use the AOA’s InfantSEE exam form (www.infantsee.org) to record all my infant exams. It is a great resource for the proper diagnostic tests needed on a very young child. You will become quite comfortable with these tests after doing a few exams.
3. INFANT EXAMS ARE NON-VERBAL EXAMS
You will rely on your skills of observation for the infant eye exam. There is no subjective refraction or traditional visual acuity testing on infants. For this reason, the infant eye exam can take much less time. With experience, your ability to quickly observe the results of your testing based on the reactions of the child will improve.
4. NORMAL FINDINGS VARY BY AGE
Normal findings for a 6 month old child have a wider range than that of a 12 month old. If your exam reveals findings outside of the normal range, be sure to take the age of the child into account, and communicate your plan with the parents. For very young children, follow-up observation alone can be an appropriate plan.
Josiah Young, OD, MS, is a partner at Opticare Vision Centers in northern Kentucky specializing in children’s vision and vision therapy. He is the AOA InfantSEE advocate for the state of Kentucky.


